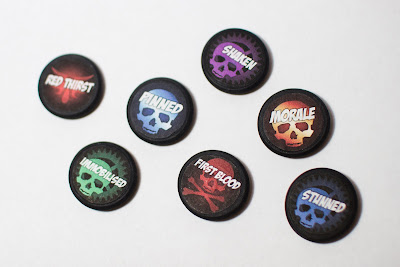
Here is my take on the vehicle damage markers and rule counters from a post over on From the Warp. I thought this was a great idea, and definitely an improvement over using dice to mark damage results on vehicles. I decided to put my photoshop skills back to work and make some for myself, and this is what I came up with. Let me know what you think in the comments...
I really liked his designs, so I wanted to make mine with the same idea in mind. I added a bit of an update and made each vehicle damage result a different color to make them easier to differentiate at a glance. I used cooler colors for the low results, and warmer for the really bad ones, so a shaken result is purple, stunned blue, immobilized green, and wrecked is orange. (I didn't make a weapon destroyed marker since the weapons on my vehicles are all magnetized, so I just take them off).
In addition to the damage markers I also added some for the 6th Ed. secondary objectives, morale, the Red Thirst (Since I play Blood Angels quite a bit) and a bunch of numbers. I figured the numbers could be used for all sorts of things like warp points, mysterious objectives, or the number of hull points remaining.
For those of you who would like to have a set for yourself I have conveniently provided a tutorial and downloadable "rule counter template". You will need a printer, some wooden coins (I got a pack from Michael's. They are about 1" in diameter), and some black paint and glue.
How to make Rule Counters:
- Save the full size of the image below by right clicking, then select open in new tab. Zoom in all the way, right click and save.
- Print the image and cut out the circles. (Make sure the print ink has plenty of time t dry before gluing to the disks.
- Take the wooden coins and sand off any bumps.
- Paint them black using some cheap acrylic paint or whatever else you have. (I primed mine as well, but I don't know if that is necessary). This may take several coats since the wood is porous.
- Once the paint is thoroughly dry, use regular white glue to stick the images on to the disk.
- You may want to varnish these once you are done just to keep them from getting too banged up.
Future rule counters:
- Turbo Boost/Flat Out
- Gone to Ground
- Crazed (Hellbrute)


These are great! I had some Custom Ork ones from last edition. I'm going to take a look at these, maybe create some Death Guard ones. Thanks for the great idea!
ReplyDeleteNo problem. They're really nice to have in a game. Looking forward to seeing what you come up with!
Delete